|
|


![]()

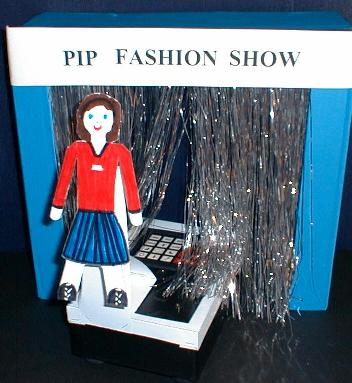
The idea is that the children design and make outfits for a mannequin. PIP moves the mannequin to make it "strut its stuff" on a catwalk. While PIP is moving, the children read out a prepared commentary to go with the outfit and the movements.
The activity has clear design and technology content and straightforward control content. However, speaking and writing may be the area where many teachers feel that this activity has a large contribution to make.
The children have to write a commentary to match the movements of PIP. As PIP moves at a moderate speed and will normally do a sequence of actions such as showing its left side then its right side, the commentary needs to move on at an appropriate pace and go through similar stages as the program. The children are forced to develop the "plot" of the commentary to match the actions.
Afterwards you will have the written commentary together with the matching program and outfit. These should meet any recording requirements.
Link to four pages of photocopiable masters. The cover fits over PIP to provide a stand for the mannequin. The mannequins can be used on their own or the outfits can be used to dress them up. The recording sheet allows the program and commentary to be kept together.
As well as these sheets you will need to have at least pencils, crayons and scissors. It is a good idea to be aware of how difficult it can be for left-handed children to use normal scissors.
You may want to add pieces of material, glue, glitter, sequins etc. if you are feeling brave! The most enthusiastic may want to have materials to make the catwalk etc. A simple sheet of cardboard cut to shape can form the catwalk. You can make a proscenium arch from a cardboard box. One idea is to use thin material glued across the arch and cut into narrow strips so that PIP can make an appearance through these "curtains" and retire behind them at the end of the performance.
The first thing to do is photocopy the cover sheet. If you can copy it straight onto card, this is best, alternatively you can copy it onto sticky paper and then stick that to card, or copy onto ordinary paper and then glue that to card. Cornflakes packet card is about the right thickness.
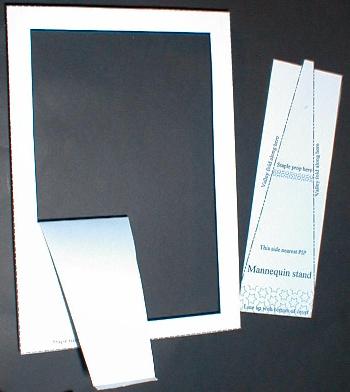
Now you can cut out the two pieces that make the cover. The rule is to cut along the solid lines, fold down along the dashed lines, and fold up along the lines with long and short dashes. The black parts are scrap, the shaded parts fold under the front and back and the starred parts are stapled together. The mannequin stand is a separate piece that should be completely cut out. It is best to crush the card along the fold lines with a hard pencil or ball-point pen to make the folding easier. Do not make the folds yet. One end of the prop is left attached to the rest of the cover and the other end is cut free.
Next make the cuts at the corners of the base, make the folds near the sides of the base, and staple the corner pieces under the front and back.
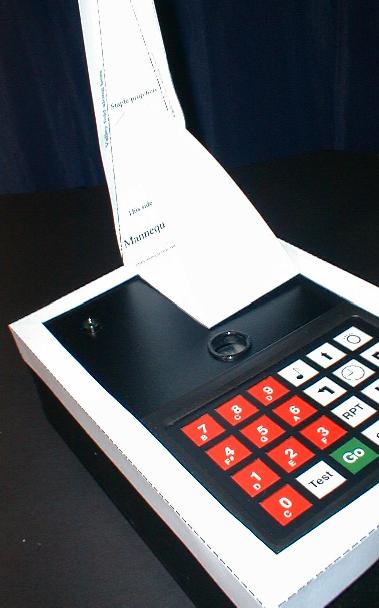
Now you should staple the mannequin stand to the front of the cover and then to the prop. Stapling to the prop is difficult but do not worry too much about appearances, just put two staples there.
Once the mannequin stand is attached, you should make the folds that you scored earlier. These give it a lot of stiffness. The folds are towards the back of PIP so that they don't get in the way of the mannequin.
There are two copies on the sheet to make copying quicker. If you want to give the children more drawing and cutting-out practice, and save some copying, you could make a master mannequin on cardboard and get them to draw round it and cut that shape out.
You can add a face to the mannequin before copying or you can ask the children to draw the face later.
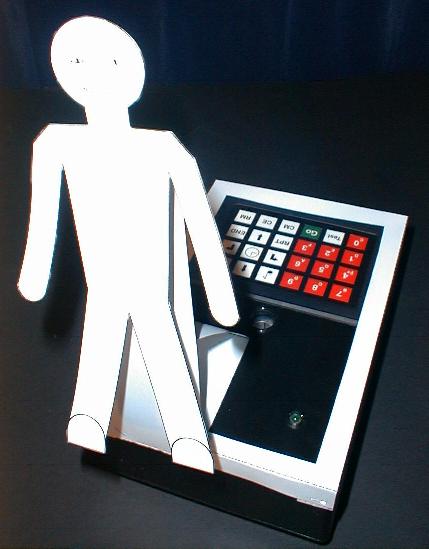
Cutting out the mannequins should be straightforward. This is the reason it has no fingers, toes or hair! The only problem may be the slot to fit the mannequin to the stand. It may be best for a teacher or classroom helper to do these with a scalpel. It is a good idea to open up the slot and check that it fits on the stand before starting to dress the mannequin up.
There is no reason why you or the children shouldn't design your own mannequins. They could even be cut-out from a magazine if you get the size roughly right.
You can stick on faces cut from magazines for topical characters if you like.
The simplest outfit is just to colour-in the mannequin. It is easy for a child to draw a stripey top in one colour and colour-in the legs to make trousers. If you do this, it is best for the children to colour-in the mannequin before cutting it out. This is easier for the child and gives a better result.
Make sure that the children draw things like buttons and belts to get the best effect.
You can make this simple outfit much jazzier by sticking things on. Glue and glitter is one approach to making the outfits more attractive.
Another idea would be to stick bits of feather or cloth on. A feather in the hat is easy to do if the hat is just drawn on the mannequin.
If you decide to use the clothes on the sheet provided, the children will find them much more difficult to cut out because of the tabs. Remember that tabs can always be taped back on in the event of mishaps!
Like the mannequins, it is easiest to colour-in the clothes before cutting them out. You are not limited to the shapes as drawn. It is easy to modify the trousers into shorts or make the dress and skirt shorter. The necklines are another area where children can use their design talents.
You can ask the children to design other types of clothes. For example a sarong should be possible and a sash should be fairly straightforward.
The funny shape in the bottom right-hand corner of the clothes sheet is a hat with a brim. An alternative approach to fitting a hat would be to have two slits in the bottom and fit it over the mannequin's head.
Having thought about the outfits to be shown, the next question is how best to display them. Part of this is the movements that PIP should make, part is the commentary that goes with the movements.
You will find it best to start with PIP's program. Encourage the children to keep it simple to start with. A simple program could have PIP moving forward, pause, turn to one side then the other and then back away or turn round and exit. Make sure that the children understand that they will have to write a story to go along with the movements and that the longer the PIP program the longer the story they will have to write.
Very keen children may use the repeat function of PIP to make long programs but this will mean that they have to write very long commentaries. Remember that models pause in the middle of their movements to allow the audience more chance to see the clothes. Use PIP's pause instruction at relevant points for this effect. Children could make PIP play a song during the pause for added interest.
Having got an outfit and a "dance", each child must write a story to go along with it. The story should include the name of the model and a description of the outfit, in terms of the clothes and the colours.
Brighter children will synchronise things so that when PIP turns to the right, they talk about, for example, the watch worn on the model's left hand.
Children must test for themselves that the spoken story takes as long as the program. An ideal story will finish just as PIP stops. Either the dance or the story can be changed to get the timing right.
It is important that children record both their program and their story. The sheet provided is an example of how to record both the program and the story on one sheet. It will be also be necessary for the children to write their names on the back of the outfits and mannequins so that you can tell who made them. The full record for a child is the sheet and the outfit or mannequin that they have made.
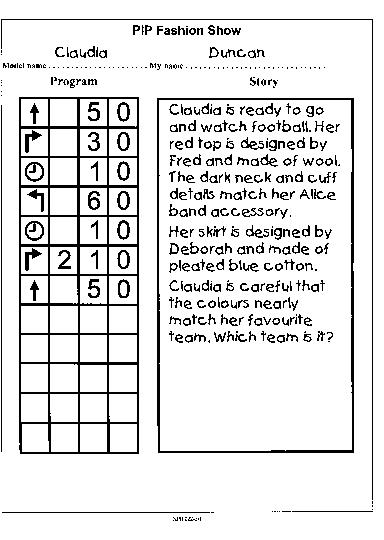
In the example I show a typical program and story. This story is the correct length to go with the program when I read it. Others may read it more or less slowly!
It shows rather "posh" symbols for movements and pauses. It should be easy for a child to draw arrows for PIP's movements but it may be appropriate either to use a circle for the clock face symbol or a letter "p" for pause.
Apart from the benefits to the teacher of having the child's efforts recorded, the child needs the record to program PIP and read out the story as the program runs. It helps the child remember exactly how the performance goes.
For a full fashion show, there will be several models and different outfits shown one after the other. A record of the running order will be needed. When the children work out how to perform the complete show, they will probably also need to know how long each program takes to run. It is a good idea for the children to measure how long each program takes and add this information to the bottom of each sheet.
It is quite an exercise in social skills for the children to negotiate the running order between themselves to get the best overall effect. The sort of thing they will need to think about is whether to show (for example) all the swimming costumes one after the other.
If they have two PIPs, so that one can be "changing" while the other is performing, they will need to think how long a change takes as well as how long the performances take. This time can be cut down by having several mannequins already dressed. One mannequin can be lifted off and the next dropped onto the stand in just a few seconds, but it will still take time to reprogram PIP.
There are a few ideas to make the fashion show even more professional. One simple thing is to make an archway for PIP to appear and disappear through. This works best with some form of curtains to hide PIP until it appears. We made ours out of cardboard covered with blue sticky-backed plastic. It has sparkly Christmas silver tinsel strip material hanging down to make the curtains. You could make the curtains out of narrow strips of coloured crepe paper.
If you want a bit more "control" content, you could get the children to read their stories into a cassette recorder for replay during the show.
If you have more than one PIP, you could have two on the catwalk at once, or you could have one on the catwalk while the other plays a musical accompaniment. Coordinating the actions of two PIPs in this way is surprisingly difficult to work out.
You may decide that a fashion show is a bit too "girly" for the boys in your class but you can get over this to a large extent by getting them to show football strip for their favourite club.
You could do the same activity as a historical pageant. So, instead of models, you have an Ancient Briton, a Roman, a Saxon, a Viking, a Crusader etc. With this idea, the children's story could be a snippet of history to go with the figure. e.g "Veni, Vidi, Vici" for the Roman, a description of a longboat for the Viking, or a bit of Shakespeare for someone in Elizabethan costume.
Moving from history to geography, you could do a selection of national costumes. The stories could be the country's name, what language they speak and how hot/wet/sunny/big it is.
One idea that I would like to try would be a pop music pageant. The mannequins are dressed up as a Teddy Boy, a Hippie, a Glam Rocker, a Punk etc. The "story" is just a few seconds of each of the types of music recorded on a cassette recorder.
If these ideas generate interest in the theatre, you could go further into this area by getting the children to present "plays". If you have several PIPs, they are the characters and the children speak the words to go with the movements. I imagine bits from Shakespeare but I expect that you will get better results from copying the latest soap opera. It is obviously best if you can get the children to create their own ideas.
If you feel really brave, you could try and put on a pantomime complete with "behind you" and "oh no he isn't". This may be particularly appropriate for children with mobility problems who could then put on their own Christmas play using PIPs with mannequins as the actors.
You might even go as far as using torches for lighting effects. You could use different coloured paper filters in front of the torch to get different effects.
You don't have to use speech-based theatre. You could have two PIPs doing a "ballet". I have seen a group of student teachers with 6 PIPs doing folk dancing; four of them dancing to the music produced by the other two. This would be an exceptional achievement for primary schoolchildren.
Another theatrical idea would be for the children to make carnival floats as covers for PIP. These can be shown individually mounted on a PIP to give movement or they can be linked together with string so that PIP can tow several of them.