|
|
Background Swallow Systems has made small commercial robots (PIP, PIXIE) for educational use since 1989. We have now started to use this technology in the IEE Micromouse Championships (DASH-1, DASH-2, DASH-TOO, DASH FREE). This note is to help those who want to know how we drive the motors or who would like to use one of our drive trains.
Our robots are based on the two wheel drive "wheelchair principle".
Both motors drive forwards or backwards to make the robot move. One drives forwards and the other backwards to make the robot turn. We use DC motors because they are more cost-effective than stepper motors and give a better power to weight ratio. Unfortunately they are much more difficult to control.
Positioning In addition to turning the motors on and off, we need to know how far they have turned. We do this with a interrupter disk mounted on the motor shaft. There are 8 holes in the interrupter disk and we shine an infra-red LED through the disk onto a phototransistor. These turn on and off for each hole as the disk turns.
The phototransistors are connected to interrupt inputs on the microprocessor.
On DASH and PIXIE robots the motors drive the wheels through worm gears such that the motor shaft turns 16 times for one turn of the wheel. DASH and PIXIE wheels are 32.5 mm diameter, so one interrupter hole corresponds to just under 0.8 mm of movement.
In practice the motors have only three poles and the armatures will only settle in one of three places. Also there is some backlash in the system. So the resolution may be 0.8 mm but it is not possible to achieve this accuracy.
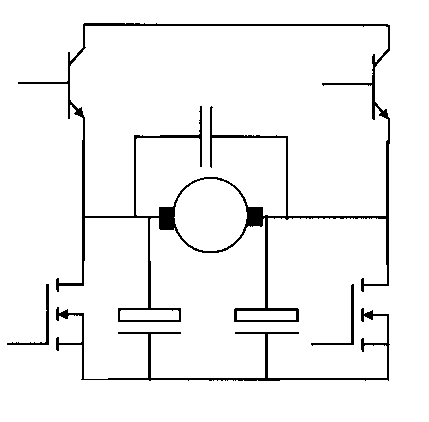
Electronic drive We drive the motors with an H-bridge arrangement. On some machines this is all power FET, on others it has bipolar transistors for the high-side drivers. This is an outline circuit diagram of the first system.
H-bridge drivers allow the motors to be driven in either direction. For either direction of drive, one high-side and the opposite low side device are turned on. You must take care never to turn on high- and low-side drivers on the same side at the same time as this will short-circuit the battery.
Our drivers are arranged so that it is impossible to turn on both drivers on the same side. In the power FET system this is done by connecting the gates of the two FETs together. When the drive signal is high the lower FET is on, when it is low the upper FET is on.
Each side is driven separately by the microprocessor. This allows both sides of the motor to be driven high, both sides low or one side high and one side low. If both lower FETs are turned on, the motor is shunted by the low impedance of the FETs and a considerable braking force is available.
With FET drivers the motors are either turned full on or shorted out by the FETs. This is wasteful of power but probably does not matter in a Micromouse entry.
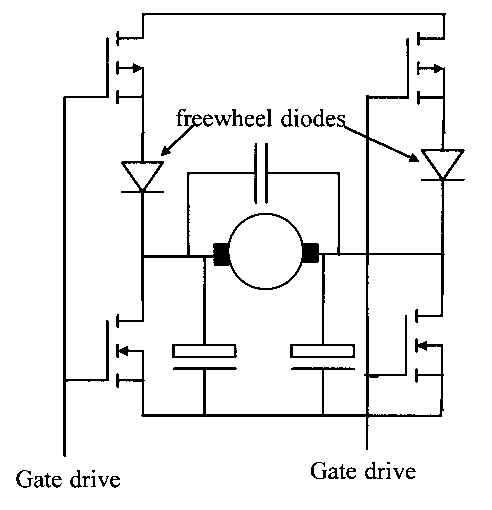
On some of our robots we use a bipolar high-side driver. When these are both turned on there is no path for braking current from the motor and it can "free-wheel". This can save a lot of battery power. A similar effect could be achieved with a FET driver by using high current diodes where shown.
Our drivers operate from 4 NiCad cells. These feed the microprocessor system as well as the drivers. This removes the need for level shifters. The drivers are fed directly from I/O bits on the microcontroller. The system can be switched on and off very rapidly. For high-speed use the motors are turned on and off in timescales of the order of 1 millisecond.
You must choose FETs that can handle the peak motor current. The resistance of the motor limits the stall current to about 3A from the cells but you should double this to allow for the situation where the motors are reversed when they are carrying a current of this order.
Another consideration is the amount of electrical noise that the motors generate. You must have a capacitor across the motor terminals and from each motor terminal to ground. You should also minimise the loop area of the wiring to the motors so you should use twisted pair or adjacent wires in a ribbon cable for the wiring to the motors.
Control Now we can turn the motors on and off, we need a way of controlling the speed of each motor and the distance that each wheel has travelled. This is where the interrupter inputs to the microprocessor come in.
The phototransistors generate interrupts to the microprocessor. When it receives an interrupt, the microprocessor stops what it is doing and turns the relevant motor off. It also increments a count for that wheel and then returns to what it was doing before. The foreground task in the microprocessor periodically waits until the motors are turned off and then turns each motor on in the appropriate direction. The rate at which it does this determines the speed of the motor. The motors are phase-locked to the foreground task by the action of the interrupts.
The foreground task can also read the counts for each motor to find out how far the motor has turned. This is used to determine when the mouse has moved to the next maze cell.
On DASH-TOO this is basically all there is to it. The speed at which the foreground task gets around to turning the motors on determines the speed and the line sensors are used to determine whether one or both motors should run and in which direction.
Wheel slip The more sophisticated robots such as PIP and PIXIE have acceleration and deceleration ramps to try and minimise wheel slip. The system has inherent anti-lock braking (ABS) and traction control but there can still be quite a lot of wheel slip. We use look-up tables of delay values to give acceleration and deceleration profiles that we have found best.
Wheel slip is a serious problem for open-loop robots that must travel round a long path accurately with no external reference. Where there is an outside reference such as a maze wall, the problem is much simpler but DASH-1 had a problem in 1995 when there was a long straight run of parallel walls with no gaps. At the end of the run, DASH-1 was one cell out in its dead-reckoning. In due course it thought it had reached the centre when it was one cell away!
There are many things that will help to minimise wheel slip. One obvious thing is softer, grippier tyres. We normally use O rings but it may be possible to get the equivalent of racing slicks if you know where to look.
Another consideration is the wall positioning system for the mouse. Each time the mouse has to make a position correction, there is an increased opportunity for wheel slip.
If you are running a proper maze rather than the standard schools competition, you should take every opportunity to correct the mouse position. You can do this whenever there is a gap in the walls as this must be at the start of a cell.
In the schools super competition the same situation occurs where a tape comes in from the side of the tape that you are running on.
These notes are not a comprehensive treatment of the subject but they do outline how we tackle the problem. If you have any questions or comments, or better still from my point of view, a better way of doing it, please contact me via e-mail. duncan@swallow.co.uk
More details about the drive train assembly Drive train part number A062 was designed for our PIXIE robot and then used in the DASH-1, DASH-2 and DASH-TOO. It is not the state of the art for mouse design but it is available assembled and tested for those who don't want to design and make their own.
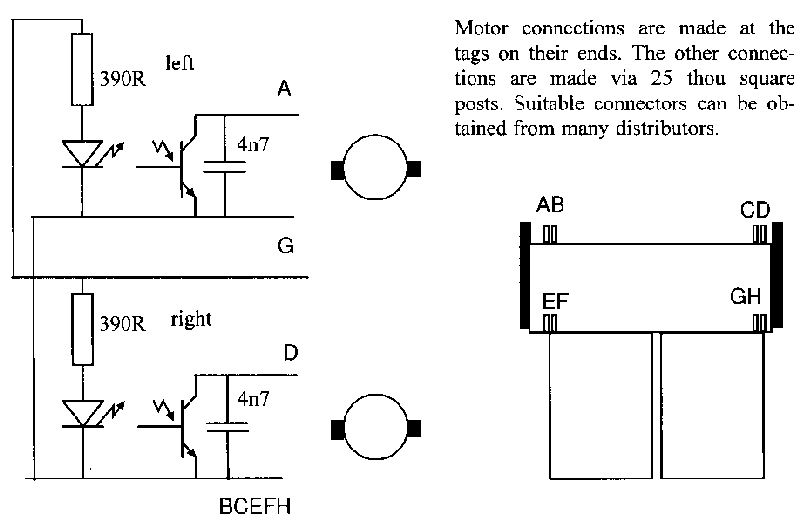
Connection and layout details for A062 drive train.
You will need to make your own chassis to carry the drive train. I would use a piece of strip board as a base and mount a socket for your favourite microcontroller card and the connectors for the drive train assembly on this. I usually solder the drive train pins directly to the stripboard.
For suitable controller boards you could contact Triangle Digital Services on 0181 539 0285. They supply a board complete with a FORTH compiler ready to run.
Alternatively you could buy a GNC uE31 board from Farnell. You can buy a FORTH for this board or you might try and use assembler or C if you can obtain support software at a reasonable price.
You will need to design and build motor drivers to interface between the controller board and the motors. I recommend that you use an H-bridge driver using power FETs. If the whole system is run from 4 NiCad batteries you will be able to use logic-level FETs and connect them directly to controller I/O bits.
Remember that the motor currents can reach 6A. Choose FETs and wiring to suit.
Optical The optical system needs protection from ambient light. We enclose the whole robot in a casing that prevents direct light from reaching the sensors. You may manage with small covers that surround the phototransistors.
The phototransistors are ROHM RPM-20PB and the LEDs are ROHM SIM20SB. We use a 22K pull up resistor from the transistor collector to positive.
EMC Great care must be taken with EMC. You can have problems both within the mouse and also to and from the mouse.
THIS DRIVE TRAIN IS A COMPONENT AND YOU ARE RESPONSIBLE FOR MEETING EMC REQUIREMENTS.
To minimise the problems you should fit a capacitor directly across the motor terminals and capacitors from each motor terminal to ground. We use 100n across the motor and 1-10uF from each motor terminal to ground. You should also consider whether the drive train should be enclosed in a metal case. All our robots have this.
You should use short motor wiring. It is best to use twisted pair or two adjacent ribbon cable cores. The loop of wire from the motor terminals, through the drivers, battery and ground should be the smallest possible area.
You must decouple the controller from the motor power supply. We use a small series resistor and a large electrolytic capacitor to ground for this purpose.
Mechanical You will need a third support for your mouse. The friction between this and the ground will determine how much wheel slip you get.
The best idea is to balance your mouse so that as much weight as possible is taken by the driving wheels. If you do this you can get away with a plain slider rather than an expensive ball transfer unit. PTFE or Teflon are ideal materials for the slider.
Remember to allow for weight transfer on acceleration or braking.
You might also want to use the friction between the slider and the running surface to damp out hunting in the wall following system. DASH-1 uses foam rubber sliders for this purpose